Last week’s post covered the installation and creation of a new project in ASP.NET Core. This week I will be expanding that existing project to create a basic contact list which will use Entity Framework Core and its scaffolding capabilities to generate the needed files from a model class. This code from last week is being used as a starting point for this post.
Add a Model
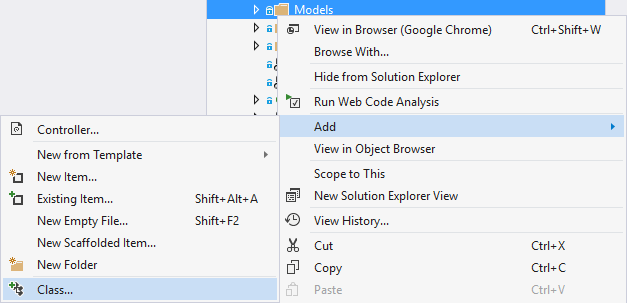
To start off I need a class to represent the information for a single contact. In the default setup the proper place to store this type of class is in the Models folder. To add a new class from the Solution Explorer window right click on the Models folder and select Add > Class menu option.
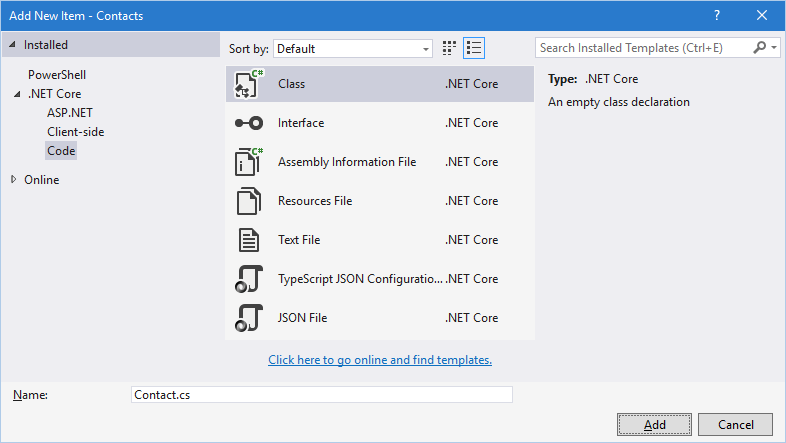
This menu choice will bring up the Add New Item dialog defaulted to adding a new class. Enter the name as Contact.cs and click Add.
The following is my resulting
Contactafter adding the properties of a contact that this application is going to use.
namespace Contacts.Models
{
    public class Contact
    {
        public int Id { get; set; }
        public string Name { get; set; }
        public string Address { get; set; }
        public string City { get; set; }
        public string State { get; set; }
        public string PostalCode { get; set; }
        public string Phone { get; set; }
        public string Email { get; set; }
    }
}
Scaffolding
Now that the application knows what a
Contactlooks like we can take advantage of a feature of Entity Framework Core called scaffolding. Scaffolding can be sued to create a number of different setups based on a model, but in this case it I am using it to generate a MVC Controller with views, using Entity Framework which will result in a controller, DbContext and associated MVC razor views being created.
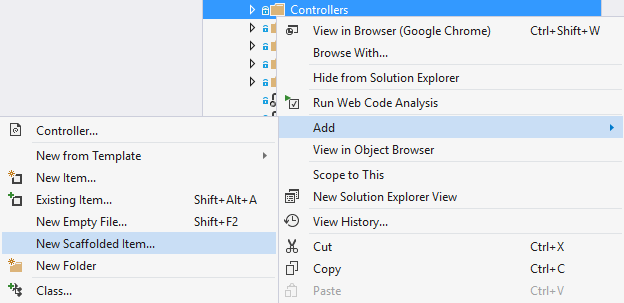
In the Solution Explorer window right click on the Controllers folder and select Add > New Scaffolded Item.
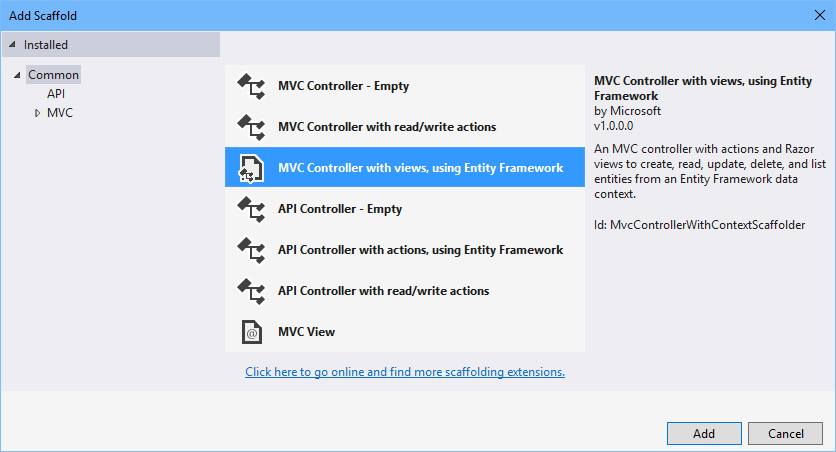
On the Add Scaffold dialog select MVC Controller with views, using Entity Framework. This is the only option that will create views. Now click the Add button.
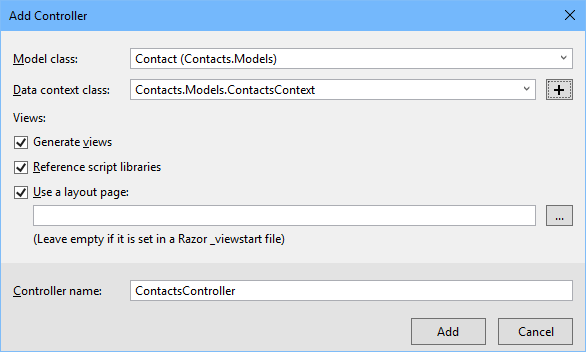
The Add Controller dialog will be shown next. First select the model that should be the base of the scaffolding operation which is the
Contactclass for this project. For the data context class option I used the plus (+) button to add a new one since this project doesn’t have an existing data context that I want to use.
After clicking add and letting the process finish the Controllers folder will now contain a
ContactsControllerand in the Models folder there will be
ContactsContext. I always move the newly created context out of the Models folder and into the Data folder to match the location used for the
ApplicationDbContext.
Entity Framework Migration
Now that the application has a contact model and DbContext it is time to create an entity framework migration which is the mechanism entity framework uses to create and/or migrate a database to match the changes made in the models of an application. Migrations can be added within Visual Studio via the Package Manager Console or from a command prompt using the .NET CLI. I am going to walk through both, but keep in mind you only need to use one.
Package Manager Console
To open the Package Manager Console use the View > Other Windows > Package Manager Console menu. Which show a window that looks like the following.
To add a migration use run the
Add-Migration Init-Contacts -Context ContactsContextcommand. The Package Manager Console is using powershell so
Add-Migrationis a command that take a parameter that is the name of the migration which is
Init-Contactsin this case.
-Context ContactsContextis required in this application because it contains more than one DbContext and the command has to know which DbContext it is working with.
.NET CLI
Open a command prompt and navigate to your project’s directory and then run the
dotnet ef migrations add Init-Contacts --context ContactsContextcommand. This is does exactly the same thing as the Package Manager Console above with just slightly different syntax.
Regardless of which version is used you will see a new Migrations folder added to the root of the project that contains a snapshot of the models referenced by the relevant DbContext as well as a migration file named by using a time stamp plus the migration name.
Automatic Database Migration
In the early stages of a project (or always if it meets your need) it is nice to automatically apply migrations instead of having to do so manually using the package manager console or the .NET CLI. One way to accomplish this is to add a static flag to the constructor of the DbContext in question and if that flag is false then use
Database.Migrate()to apply any migrations that the database is missing. Here is an example using my
ContatsContextclass with the flag named
_created.
public sealed class ContactsContext : DbContext
{
    private static bool _created;
    public DbSet<Contact> Contact { get; set; }
    public ContactsContext(DbContextOptions<ContactsContext> options)
        : base(options)
    {
        if (_created) return;
        Database.Migrate();
        _created = true;
    }
}
Add Navigation
At this point you could type in a URL that would take you to the index action of the new
ContactsController, but it would be much more useful to add a link to the sites navigation bar to provide an easy way to access the new functionality. The code for the navigation bar can be found in
_Layout.cshtmlwhich is located in the Views > Shared folder.
The navigation bar is defined using an unordered list with a class of “nav navbar-nav”. Add a new link to the unorderd list labeled Contact List. This new link needs to point to the index action of
ContactsController. ASP.NET Core provides some tag helpers to assist in building links to controller actions. Using the
asp-controllerand specify “Contacts” as the controller which will resolve to the
ContactsControllerand then use
asp-actionset to “Index” to point to the index action.
<ul class="nav navbar-nav">
    <li><a asp-area="" asp-controller="Home" asp-action="Index">Home</a></li>
    <li><a asp-area="" asp-controller="Contacts" asp-action="Index">Contact List</a></li>
    <li><a asp-area="" asp-controller="Home" asp-action="About">About</a></li>
    <li><a asp-area="" asp-controller="Home" asp-action="Contact">Contact</a></li>
</ul>
Wrapping Up
Now when the application is run there will be a link for Contact List at the top that will trigger actions in the new controller and backing database table.
Next week I play to take this same project and add a web API end point to it and show how that end point can be verified using Postman.
The code that goes with the post can be found here.
